Asimov: Building an interactive robot with an iRobot Create and a Kinect

The CS program at my university requires all students to complete a group project of their choosing during the required software engineering course known as the senior design project to the wider college of engineering. My group consisted of 5 people with the goal of using an iRobot Create (like a Roomba, but without the vacuum) and a Microsoft Kinect to create a robot that would take gesture and voice commands and follow or avoid a person. The finished product looked as such:
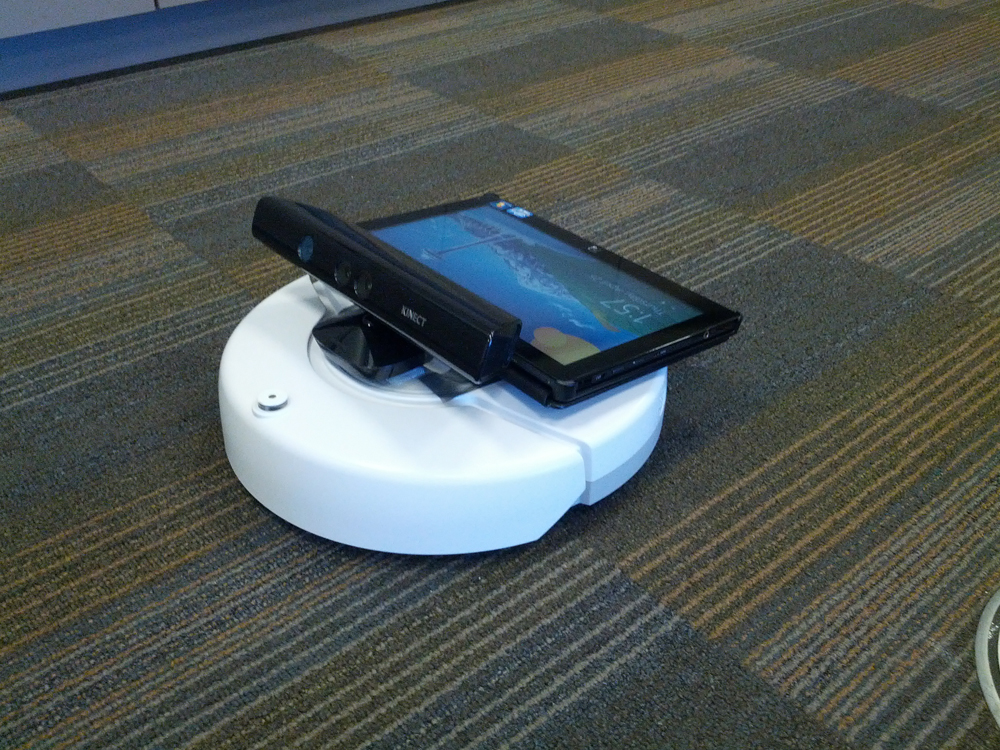
From a hardware point of view, the robot consisted of three major components. On the bottom is the iRobot Create and sitting on top of it was a Windows 8 tablet used and a Kinect. The Kinect talked to the tablet which ran our software to interpret the data from the Kinect and then send the appropriate commands to the Create. Therefore, the resulting software stack was as follows:

Encrypted chat with Python, M2Crypto, and NCurses

A couple of weeks ago I realized that there isn’t a simple way to communicate with someone over a strongly encrypted channel without going through an intermediary server when at least one of the parties is not a very technically minded person (there probably is such a such a thing, but I don’t know of it). I wanted to be able to perform basic chat with someone that doesn’t know anything about cryptography and do it without having both people connect to a server. Rather, I wanted a simple server that I ran and sent a friend a simple binary that would ask the hostname of my server and we could chat securely.

Enter my new project, Cryptully. It’s a simple Python application that allows for AES encrypted chat for people that don’t know anything about crypto. As of the time of this writing, the project is at its first milestone. That is, it has a basic Curses UI with asynchronous chat and, of course, everything is encrypted.

The project is pretty straightforward right now, but let’s look at the a few components. First, the crypto functions that encrypt and decrypt data between the server and client with AES.

1
2
3
4
5
6
7
8
def generateKeys(self, bits=2048):
    # Generate the keypair (65537 as the public exponent)
    self.localKeypair = M2Crypto.RSA.gen_key(bits, 65537, self.__callback)

    # Generate the AES key and IV
    self.aesKey  = M2Crypto.Rand.rand_bytes(32)
    self.aesIv   = M2Crypto.Rand.rand_bytes(32)
    self.aesSalt = M2Crypto.Rand.rand_bytes(8)

The generate keys function is generates an RSA keypair using the M2Crypto RSA key generation function. Then, it generates a 256bit AES key by pulling 32 bytes from the kernel’s urandom source. The same process is done for the IV and salt (except the salt is only 8 bytes).

libBiscuit: A simple iRobot Create C API

For my senior design project at my university, my group and I decided to attempt to make a robot out of an iRobot Create, Windows tablet, and Kinect that would find a person and follow him or her around a room and allow the person to control the Create with gestures and speech recognition. We called all this Project Asimov, and at the time of this writing, it’s still under development. However, one of the first pieces of code that needed written was an API to more easily interface with the Create. Thus, after some experimentation and a thorough reading of the Create Open Interface, I had a working API written in C called libBiscuit. Why? Because the Create sort of looks like a biscuit and I like biscuits.

Anyway, first up, all the code is open source and on GitHub under the LGPL. Moreover, a quick overview of the functions, compiling instructions, and basic usage are in the README in the GitHub repo so I won’t repeat all that here. However, here’s a short example program that uses libbiscuit to control the Create.

StairLights: An Arduino-based LED stair lighting project

I’m a big fan of LED lighting; especially interactive LED lighting so over the past two or so months I was working on a little side project that uses an Arduino Uno to read two IR receivers for beam breaks at the top and bottom of my stairs and shows an LED pattern while the person is walking up or down the stairs. All the code is open source on GitHub under the LGPL.

First, here’s the finished product in action:

Writing custom data to NFC tags with Android example

I wanted to add NFC functionality to my RelayRemote project but found the amount of examples about writing custom data to an NFC tag on Android very lacking. The Android docs have a bunch of info on basic NFC and how it works, but for actually writing the data to the tag, they try to push you to some convenience functions that were added in Jelly Bean (4.1). Unless you’re targeting Jelly Bean and up (not likely at the time of this writing), it doesn’t help to use these functions.

In my case, I wanted to write the ID of a relay to turn on/off to the tag, which would then be read, have the ID looked up in the database, and let the network thread class send the data to the server. The first step in this process was writing the NFC tag. To do this, we set up a pending intent with an intent that has the data to write to the tag in it. Android will execute this pending intent the next time a tag comes into range. Basically, what we’re doing is putting the device into a sort of write mode where when a tag comes into contact, Android will get our app a callback and we’ll try to write our data to the tag.

The intent setup looks something like:

1
2
3
4
5
6
7
8
9
10
11
12
13
// Construct the data to write to the tag
// Should be of the form [relay/group]-[rid/gid]-[cmd]
String nfcMessage = relay_type + "-" + id + "-" + cmd;

// When an NFC tag comes into range, call the main activity which handles writing the data to the tag
NfcAdapter nfcAdapter = NfcAdapter.getDefaultAdapter(context);

Intent nfcIntent = new Intent(context, Main.class).addFlags(Intent.FLAG_ACTIVITY_SINGLE_TOP);
nfcIntent.putExtra("nfcMessage", nfcMessage);
PendingIntent pi = PendingIntent.getActivity(context, 0, nfcIntent, PendingIntent.FLAG_UPDATE_CURRENT);
IntentFilter tagDetected = new IntentFilter(NfcAdapter.ACTION_TAG_DISCOVERED);

nfcAdapter.enableForegroundDispatch((Activity)context, pi, new IntentFilter[] {tagDetected}, null);